Wednesday, October 28, 2015

Dreaming Tree


So, I bought this file from Dreaming Tree @
3DSVG.com
for a Cardinal Christmas Card.

It came out really cute, but it
is way larger than I expected

It's a little over 9 inches tall
and about 6.5 inches wide and
just less than 2 inches deep.

I don't normally send cards
this large, but I do love it so.
This will have to go to just the
right recipient.

Saturday, October 17, 2015

Craftsy Class

So, I  received an email from Craftsy telling me
about some classes that they are offering on line.

I had not heard of them before, so I decided to check them out.

The class that was sent to me was 'Lovely Layered Cards' by Shari Carroll.

I signed up.....I can watch them anytime, anywhere and ever how often
I want to.  It was actually pretty interesting and
helps me to up my game on my card making.

Here's the first one that I did using Distressed Inks by Tim Holtz and
a few other things.

I like it!


My Addiction

I have ever mentioned that I absolutely LOVE SVGCuts.com.......I mean, they have the coolest, neatest, raddest, whateverest designs for my Cricut.

And here's the latest one that I just had to do:  The Haunted Party Barn


It seems to fit right in with the haunted houses I
did from their designs last year.


Monday, September 28, 2015

Inspiration

 I can't take the credit for the inspiration of the fold edge of this card.
I had pinned a video on Pinterest by Brianna Thompson and
I decided to see if I could make it in Design Space with my Explore..

Here's what the side looks like:
And here's what the entire card looks like:

The paper came from Simon Says Stamp October Card Kit.
I made the black frame squares in DS as well.

Not bad.

Something not made of paper

 Occasionally, when I feel my hands can take it, I love to quilt.  It
makes for a good project that will keep me busy for
most of the cooler months coming up.

I don't use a large quilt frame, I use a hoop and can
work on it while watching television.

This one is just a small lap quilt that I made a few
years ago to use in the car while traveling.

I love the pattern!  I found it a few years before
I made this one and can't for the life of me
remember the name, but I knew I had to try it, and I love
the outcome.

So, I decided to enlarge the pattern to make a
queen size quilt for the bed.  I also don't machine
sew these.  Everything is done by hand.......EVERYTHING.

Next I need to add a border on this, then layer and begin 
quilting.

Thursday, August 27, 2015

A double step stamping card

I did this card yesterday after I saw a video by
Brandy Cox on Triple Step Stamping.

I did this one by hand but I will be creating it in
DS so that I can do it again.  While it is not perfect,
I do like the outcome.

Edit:
Ok, I've created this in DS
and here's the result:

Not bad....

Monday, August 24, 2015

SimonSaysStamp September card kit.


I watch YouTube videos for inspiration, how about you?

I have several people that I 'follow' and one of them is
Vicki Papaioannou.  I get a lot of different inspirations from her.

I have noticed several videos of her creating a card
from the SimonSaysStamp card kit each month.

I finally discovered that I could order the same kits
myself. So last week I ordered the September kit
and received it on Saturday.

You receive several sheets of 8 1/2 x 11 paper and several of 
the 6x6 paper and a stamp set.  There are additional items included
to assist in your designs.

There is also a sheet showing several cards
that designers have made using the items
that are included in the kit for you to 
use as inspiration.

I got down to business this morning and used
the one designed by Debby Hughes as inspiration.
You can see it there at the bottom of the picture.


I used my Cricut to cut the Smile and arrow tags out.

The grey and yellow paper, and yellow twine were not included
in the kit, I had those on hand.  And I had ordered
the sequins at the same time that I ordered the kit.

All in all, I think it came out pretty cute. I will be sending
this one to another friend.

I think I will be ordering these kits on a regular
basis.  So totally worth it.

We all do 're-do's'


I have a friend that I use to work with and every morning we
started our day off with a hug.  Every one loves hugs!! And it helped
start the day off right.

I received a card from her last week sending me a 'hug'.

I knew that I needed to send her one back and set out to 
make a card just for that.  I came up with the one
on the left but the more I thought about it I just felt 
like it was missing something.  So, I did a 're-do'.

I put a subtle patterned paper behind the top layer to
give it a little more interest. And I used sequins this time
instead of the enamel pieces.  Both versions
have Wink of Stella on the butterfly.  

I just like the second one better......

Sign of the times.....

We recently retired and moved to another state.
We had bought a home in this new state earlier in the year knowing
that we would retire by the end of the year.

Our house sold much quicker than 
we expected and found ourselves retiring much
earlier than anticipated.

We've been here a few months now and I
finally got around to making a sign for the
house.  We named it Fernwood Hill because
of the location.


I think it came out pretty cute.

I found the wood sign at my last trip
to Hobby Lobby. I painted it with a light
coat so the wood grain would show through.
Then applied the name with vinyl.  Thought
I never was going to get that to stick!

Then I took some stamps I had of ferns
and applied some there and there in green and silver.
I ended up sealing it with a couple of coats of
Modge Podge just to protect it from the elements.

It now hangs on the front porch.

Tuesday, August 11, 2015

Trying something new

There have been several request lately over on the DS Facebook page for a lacy style card, people
wanting to use them for wedding invitations, etc.  Now, I know there are some svg's out there that
can be bought to use, but I've been wanting to give this a try myself.  After playing with the weld and slice tools over the weekend to make the cards in my previous post, I thought....go for it!

So here's how I started.  Insert a box and resize accordingly.  If you are making a gate fold card - as my sample is, then it will need to be long and narrow.  Once you have that in a size that you can work with (remember, you can always resize later for the correct size of the card) then duplicate that box by copy and paste.


Now, resize one of those boxes to a bit smaller and be sure to change the color of one
of them so you can see what you are doing.  You want to get an even border
around the edges.

Once you are happy with the border, then select all and Slice.  Remove the
center box and delete it, you aren't going to need it for anything.


Now insert your image that you want to fill the borders with.  I chose a 
rose image to use.....remember it needs to be a lacy image.

This image had a background (the pink) so I ungrouped and deleted 
the background since I won't be needing it.


Now, take your image and copy and paste it several times,
you won't need all of them, but give yourself enough to
work with.

Now this next part is just going to take some patience and
tweaking until you get it to where you like how it looks. Don't
forget the images have to be touching each other and the border.

Don't forget you can flip and mirror the images
so the will help fill the space and make it
look more interesting.

Once you are happy with how it looks then select the box and Weld.
To make a gate fold card, copy and paste the box so you have two now.
Delete all unused images.


Add another box and change the color on it. Resize it to where
the two lacy panels fit over the box and it's color shows through.
This will be what the card will look like finished.


Now move the panels to either side of the box, in my case
I move the left hand panel to the right side and the right hand
panel to the left side so it would end up looking
just like the picture above.  As we 
are looking at the image below we see the 
INSIDE of the card.

Again, once you are happy with the size and placement - remember
they need to be touching each other - select all and Weld.

Don't forget to add your score lines for folding!!


Here's my end result, I cut a panel to fit the
inside of the card so you can add your message to
and finished it off with a bow to close it up.


Makes it look like a very special card or
invitations!


Sunday, August 9, 2015

Personal Challenge

We all challenge ourselves in one way
or another.  I decided this weekend that I
wanted to create a few greeting cards
by using the weld and slice tools 
in design space.

Here's what I came up with:


By just adding a bit of bling here and
there, I think they came out pretty cute.
I'm happy.

Friday, August 7, 2015

My Pinterest Challenge

I love Pinterest, I go there to find inspiration for things
that other people have made, mostly cards, but sometimes
other things.

So, the other day I decided to go back through the pins
I have all handmade cards and come up with my version.

First was this card from Lisa Stenz.

Really cute and required me to work in Design Space
to come up with the shape of the card. Then to find the
right flowers and leaves.

Here is my first version:

Not bad for a first try, but I felt it needed a bit
larger flowers and maybe one more.
So, here's the second try:

Yes, much better.

Here is my second challenge, a card from Dawn Olchefske:

I love it because of it's simplicity.
Here's what I came up with.

I am very happy with this one.  I embossed with a 
glittery powder from Martha Stewart.  I went with
what I felt like was a southwestern color pallet.
The banner has a bit of ink on the edges but doesn't seem
to show up in the picture because of the lighting.

All in all, not too bad.

Wednesday, August 5, 2015

A How-To on something pretty easy

Someone posted the other day on the FB Cricut Design Space page
asking if something like this was possible.


I decided to give it a shot and see what I could come up with.
It ended up being pretty easy actually.

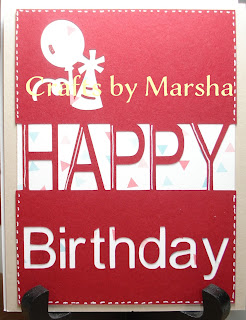
In DS insert a box (or any shape that you would like to use) and size
it how you would like it.  Be sure to make it a larger size so that
you can work with it, you can always resize it later for the cut.

Add a text box with the word that you want on top, here I used
Happy, and select the font you want to use.  
Position it to the top of the box or shape, remember,
it has to be touching the box. Then 'select all' and slice.
Remove the pieces of the letters that appear inside the box, in
this sample that would be the lower portions of the 'p' and 'y'.
Then select all again and weld.  This should attach the word
to the box.  Now enter another text box with the next word,
here that would be Birthday.  Position that word inside the box, be
sure to to center it accordingly, and slice.  Remove the letters 
that would just sliced out of the box and voila!

Now you can resize that the whole thing to the size of
the card or whatever you want to place this on.  In the
above sample I just placed it on a piece of white card
stock so you could see it.  With this font I had to glue 
in the inner parts of the B d and a, so be sure not
to lose those from your mat when removing the cut from the mat.

There you go.  That was easy!

Tuesday, August 4, 2015

My first shaker card

 I have a friend's birthday coming up and wanted
to make her a card.  I decided to give a try at making
a shaker card.  I like the way it came out and
I think she'll like it as well.

Additional item

I decided I wanted to make one more thing for the box
for my friend.  I love this little box from SVGCuts.com.
It's perfect to hold little things in and is so easy to
put together.

My friend received her box yesterday with
everything in it and was so thrilled by the
contents.

THAT is what makes me happy!

Monday, July 27, 2015

Gifts for a friend

 I have a friend that I met on Facebook a few years ago. While I have
not met her face to face, we grew up in the same area and I feel as
though I know her very well.  I do know members of her
family so it was a natural really.

Anyway, she lost her little dog a few months back. He was
diagnosed as diabetic just like my dog Piper. However,
Jack went downhill pretty quickly and she lost him.

I was so sad for her, still am really.  Jack and Piper look an awful
lot alike and she really loved him a lot.

I wanted to make something for her and have finally
found the time to do so.  First is the coffee cup I
made her.  I found the design on line and was
able to add Jack's name to it as a remembrance.
 I added a couple of little paw prints to the back as well.
 I wanted to make her a tote bag as well.  I decided to 
keep it simple and just added her initial.
She loved this little cottage box that I had made
previously so I decided to send it along as well.
I hope she likes these, I'm pretty sure she will.

Wednesday, July 22, 2015

Farmer's Market

The little town that we recently moved to has
lots of Farmer's Market, Flea Markets, etc. and 
there is one that is not too far from the house.  I thought
I would give it a try so I've been working the 
past two weeks on a few projects to see
how they might sell. I kept the majority of
them pretty simple so I can keep the 
prices reasonable since the area
doesn't have a high economic base.


Here's the breakdown:


Most of the files are from SVGCuts.com.  There are some found
in the CDS files with either cartridges I own or from the subscription I have.


Here's what the box for the ornaments look like from the outside.


All of these are from 3DCuts.com - except for the
sunflower, which is from SVGCuts.com...I just used one of the alpha 
boxes to put it in.